Docker常用指令之Dockerfile入门
本文共 1350 字,大约阅读时间需要 4 分钟。
文章目录
基于Dockerfile创建镜像
Dockerfile中的指令
Dockerfile 是一个文本格式的配置文件, 用户可以使用 Dockerfile 来快速创建自定义的镜像,下面是Dockerfile中的一些指令说明:
| 分类 | instruction | 说明 | 用法 |
|---|---|---|---|
| 配置指令 | ARG | 定义创建镜像过程中使用的变量 | ARG VERSION=2.2 |
| 配置指令 | FROM | 指定所创建镜像的基础镜像 | FROM DEBIAN:${VERSION} |
| 配置指令 | MAINTAINER | 镜像作者或者电子邮箱 | MAINTAINER WangLK |
| 配置指令 | LABEL | 生成的镜像添加元数据标签(键值对形式) | LABEL VERSION=“2.2” LABEL author=“WangLK” |
| 配置指令 | EXPOSE | 声明镜像内服务监听的端口 | EXPOSE 8808 |
| 配置指令 | USER | 指定运行容器时的用户民或UID | RUN groupadd |
| 配置指令 | WORKDIR | 配置工作目录 | WORKDIR /a |
| 配置指令 | ENV | 指定环境变量 | ENV APP VERSION=l.0.0ENV APP_HOME=/usr/local/app ENV PATH $PATH:/usr/local/bin |
| 操作指令 | RUN | 运行指定命令 | RUN mkdir -p /a/b |
| 操作指令 | CMD | 启动容器时指定默认执行的命令 | CMD ["–spring.profiles.active=dev"] |
| 操作指令 | ADD | 添加内容到镜像(压缩文件会自动解压) | ADD jdk-8u171-linux-x64.tar.gz /a/b |
| 操作指令 | COPY | 复制内容到镜像 | COPY src本地主机,dest镜像 |
在编写玩Dockerfile后,通过命令来创建镜像
docker build -t tag:1.1.1 .#创建镜像,最后的点表示当前目录,即Dockerfile所在目录,-t表示镜像标签docker build -f /tmp/docke_builder/ #-f可以指定上下文路径
.dockerignore文件
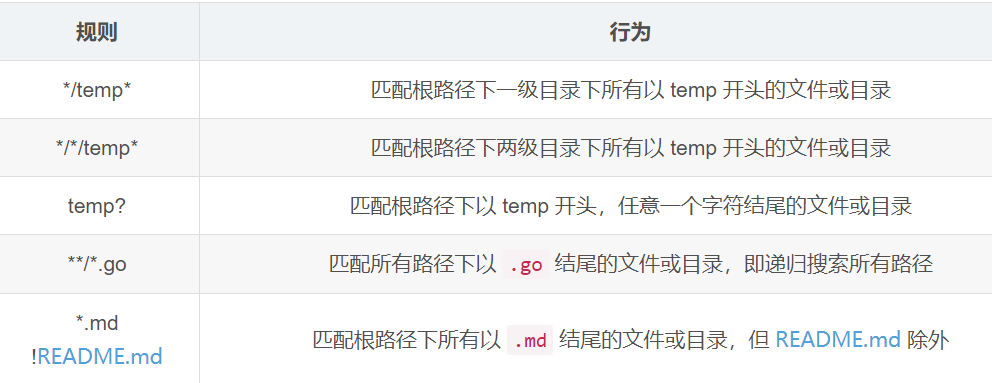
因为创建镜像,会将指定上下文路径中的数据发送给Docker客户端,所以上下文不能过大,否则会延缓镜像创建的过程,所以我们偶尔需要忽略上下文中的一些路径或者文件,此时就要用到.dockerignore文件

*表示任意多个字符
?表示单个字符
!表示不匹配
下面给一个使用Dockerfile构建jdk1.8的镜像
FROM centos:7MAINTAINER WangLKWORKDIR /usrRUN mkdir /usr/local/javaADD jdk-8u171-linux-x64.tar.gz /usr/local/javaENV JAVA_HOME /usr/local/java/jdk1.8.0_171ENV JRE_HOME $JAVA_HOME/jreENV CLASSPATH $JAVA_HOME/bin/dt.jar:$JAVA_HOME/lib/tools.jar:$JRE_HOME/lib:$CLASSPATHENV PATH $JAVA_HOME/bin:$PATH
转载地址:http://bbeu.baihongyu.com/
你可能感兴趣的文章